 |
CADconform for MicroStation Readme |


Installation Types
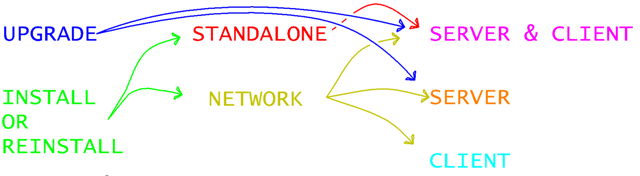
This
option is available when installing CADconform after an existing
installation has been detected. This option allows the minimal program
update to be performed without overwriting the user settings or
configuration. This is often useful when installing a new version of
the software over the top of an existing installation.
This
option is available only when an existing CADconform installation has
been detected. A reinstall allows the existing install to be ignored or
overwritten, and a new install to be performed on the same machine.
This can be done to overwrite existing files in the same directory, or
to install to a new path. Reinstallation may be useful if a previous
installation of CADconform has been manually deleted or has been misconfigured and no longer operates.
The Standalone install should only be used for single licences of CADconform, test machines, laptop
installs or computers not connected to the network; as this install
type will not allow other machines to connect to it without some manual configuration
after the installation has completed.
The Network Installation is the normal installation type
for deploying CADconform to multiple computers. It allows the server to be nominated, as well as a share
path and share name to be configured for access by the client machines.
Installation
of CADconform begins with the Server install. The server install
type installs the executable files for CADconform, as well as the
documentation, example databases, menus and configuration files. The
server installation can also create the Windows network share name for
the CADconform server folder. The path chosen for the server install is
written to the configuration files during installation, which are also
used by the CADconform client. Note that you do not have to be on the
server machine in order to install CADconform. Installation of the
server component of CADconform can be performed from any machine to any
other machine. Bear in mind that the uninstallation settings are
written to the Windows Registry, and therefore the same computer should
be used to uninstall as was used for the first install, even if the installation location is to a remote server.
The Client Install sets up a standard MicroStation configuration file telling MicroStation where CADconform is installed and how to locate the various resources. Client machines must have either MicroStation or PowerDraft installed (see the Installation Prerequisites for more information) and the CADconform server component needs to have already been installed somewhere on your network. This installation type is used to configure MicroStation load CADconform. This is configured by the installer by writing a single file "CADconform.cfg" into the "\Config\appl\" directory within the MicroStation program folder. Configuration files in this folder are automatically loaded when MicroStation is started regardless of the current workspace, so this ensures that the CADconform server path is set regardless of how MicroStation itself is started. If you don't wish to visit each computer to run the installer for a client install, then other options are available, as shown in the Client Network Installation instructions below.
Client installation can be configured either one of four ways:
-
Simultaneously when installing the CADconform Server component (available only with the "Server & Client" installation option).
-
Separately on each machine (run the installer and choose the "Client" installation type)
-
Using a shared network configuration file (see "Client Network Installation" below)
- Manually copying the required configuration file.
This
installation type is useful for standalone testing, or where the server
is also a CAD workstation, or where CADconform will be run from a
laptop that may not always have connectivity with the server.
Client Network installation can be performed if MicroStation has already been configured to use a MicroStation project or workspace from a shared network resource. CAD Administrators usually achieve this by copying the preconfigured Workspace folder to a network device and then manually setting the $(_USTN_WORKSPACEROOT) directory on each CAD client machine to point to the network. The advantage of doing this is that each CAD client will then use one shared workspace, thus making CAD administration easier.
| NOTE: To view configuration variables in MicroStation that are prefixed
by an underscore (e.g. "_USTN_WORKSPACEROOT"), you need to define the
variable "_USTN_DISPLAYALLCFGVARS" and set it to "1". After doing this and saving the changes, reopen the Workspace Configuration dialog and the hidden variables should now appear after the ones normally displayed. |
If you have a setup like this, then CADconform can take advantage of it so that it is not necessary to install the CADconform client component on each client machine. To set up a network installation, several lines may need to be added to your network configuration file (either PCF, UCF, or CFG). Which file you alter will depend on both how your current workspace configuration is set up, and also whether you want CADconform loaded under certain workspaces or all of them. This configuration only needs to be done once. Upgrades or resintalls of CADconform should be able to continue without requiring these steps, as long as the network path to the workspaces or CADconform has not changed.
Here are some basic setup options for configuring CADconform for all clients:
1) Setting up CADconform to load for a particular project:
- Locate the appropriate Project Configuration File (PCF). The project files location can be found by looking for the the expanded value of the $(_USTN_PROJECTSROOT) variable.
- Open the file in a Text Editor such as NotePad.
- Add the lines shown below in the section "Including the CADconform configuration file".
- Save the file.
- Restart MicroStation and choose the edited project in the MicroStation Manager.
- CADconform should now automatically load.
- Locate the appropriate User Configuration File (UCF). The user files location can be found by looking for the the expanded value of the $(_USTN_USER) variable.
- Open the file in a Text Editor such as NotePad.
- Add the lines shown below in the section "Including the CADconform configuration file".
- Save the file.
- Restart MicroStation and choose the edited user in the MicroStation Manager.
- CADconform should now automatically load.
This can be achieved in one of two ways, depending on whether you already have a configuration file that is read by every CAD client computer. Here are the steps for each method:
Method 1: A networked configuration file already exists:
- Locate the appropriate configuration file (for example: "L:\CADD Data\Workspace\Altiva_Site_Settings.cfg").
- Open the file in a Text Editor such as NotePad.
- Add the lines shown below in the section "Including the CADconform configuration file".
- Save the file.
- Restart MicroStation and choose any workspace project or user
- CADconform should now automatically load.
Method 2: No networked configuration file currently exists:
- Locate the "Config" directory under the CADconform Server installation path. Note there are several configuration files in this directory for each platform.
- Copy the appropriate config file for your platform, e.g. "\CADconform\Config\Networked_Workspace_Settings_for_MicroStation_V8i.cfg"
- Paste the file into the site/standards workspace directory as specified by $(_USTN_SITE) on the network, e.g. "L:\CADD Data\Workspace\Standards\"
- Restart MicroStation and choose any workspace project or user
- CADconform should now automatically load.
| NOTE: If MicroStation does not load following either an Install, Reinstall, Upgrade or modification of the configuration files as shown above, then see the "Troubleshooting" chapter below. |
Copyright 2001-2016 Altiva Software, Inc. Last modified by Piers Porter.